Showing posts with label Blog. Show all posts

How To Add Social Media Follower Icons To Your Blog Side Bar


This tutorial helps you to add Custom Social follower Widget in your blogger Blog that helps your readers to follow your blog through Social Media Sites (Like Facebook, Twitter Etc). Its Also a great way of getting more traffic. There are several ways to add a Social Follower widget in your blog.


Follow Steps to add this Social Follwers Widgets in your Blog

1. Go to blogger.com. If you have more then 1 Blog then select the blog in which you want to add this Social Follower Widget.

2. Now Click on Template >> Edit HTML. As shown in the Pic.


3. Now press (ctrl + f) button you will get a get a Search Box And Search <head>. And Paste the below link after Head tag. And click on Save Template
<link rel="stylesheet" href="path/to/font-awesome/css/font-awesome.min.css">

4. Click on Layout >> Add a Gadget. As shown in the pic below.


Also Read :- Earn money with Amazon

5. Now you see a PopUp as shown in the Pic Below. Now click on HTML/JavaScript
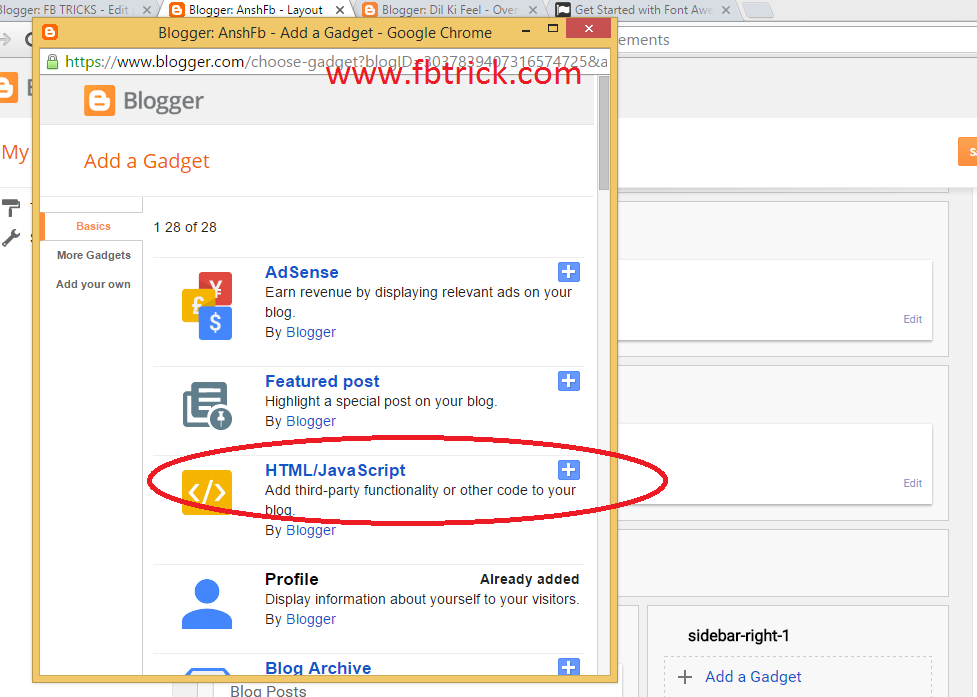


6. Now you see something as Shown in the pic below. 
Blogger social follower widget

7. Enter In Title field "Follow Us" and Copy the below code and paste it in Content Field.

<style>
.Fbtrick_Socail_Wrapper {
float: left;
width: 48%;
text-align: center;
margin-right: 4% !important;
margin-bottom: 10px !important;
color: #fff;
}
.Fbtrick_Socail_Wrapper:nth-child(2n+2) {
margin-right: 0 !important;
}
#sidebar .widget {
margin-bottom: 35px;
}
.social_item {
position: relative;
display: block;
height: 107px;
padding: 10px;
overflow: hidden;
}
.social_icon {
font-size: 2rem;
display: inline-block;
margin-top: 5px;
margin-bottom: 9px;
}
.social_num {
line-height: 44px;
width: 100%;
height: 41px;
font-size: .875rem;
display: inline-block;
}
a.social_item.social_facebook {
background: #3F5B9B;
}
.fa-facebook.social_icon ~ .social_num {
background: #2E4372;
}
li.Fbtrick_Socail_Wrapper:hover .fa-facebook.social_icon ~ .social_num {
background: #3F5B9B;
}
li.Fbtrick_Socail_Wrapper:hover .social_facebook {
background: #2E4372;
}
a.social_item.social_twitter {
background: #1C97DE;
}
.fa-twitter.social_icon ~ .social_num {
background: #1571A5;
}
li.Fbtrick_Socail_Wrapper:hover .fa-twitter.social_icon ~ .social_num {
background: #1C97DE;
}
li.Fbtrick_Socail_Wrapper:hover .social_twitter {
background: #1571A5;
}
a.social_item.social_youtube {
background: #E22020;
}
.fa-youtube.social_icon ~ .social_num {
background: #B31919;
}
li.Fbtrick_Socail_Wrapper:hover .fa-youtube.social_icon ~ .social_num {
background: #E22020;
}
li.Fbtrick_Socail_Wrapper:hover .social_youtube {
background: #B31919;
}
a.social_item.social_dribbble {
background: #E82159;
}
.fa-dribbble.social_icon ~ .social_num {
background: #B51A45;
}
li.Fbtrick_Socail_Wrapper:hover .fa-dribbble.social_icon ~ .social_num {
background: #E82159;
}
li.Fbtrick_Socail_Wrapper:hover .social_dribbble {
background: #B51A45;
}
a.social_item.social_rss {
background: #E86321;
}
.fa-rss.social_icon ~ .social_num {
background: #C2521B;
}
li.Fbtrick_Socail_Wrapper:hover .fa-rss.social_icon ~ .social_num {
background: #E86321;
}
li.Fbtrick_Socail_Wrapper:hover .social_rss {
background: #C2521B;
}
a.social_item.social_google-plus {
background: #E82C2C;
}
.fa-google-plus.social_icon ~ .social_num {
background: #BF2424;
}
li.Fbtrick_Socail_Wrapper:hover .fa-google-plus.social_icon ~ .social_num {
background: #E82C2C;
}
li.Fbtrick_Socail_Wrapper:hover .social_google-plus {
background: #BF2424;
}
a.social_item.social_linkedin {
background: #0275B6;
}
.fa-linkedin.social_icon ~ .social_num {
background: #02669E;
}
li.Fbtrick_Socail_Wrapper:hover .fa-linkedin.social_icon ~ .social_num {
background: #0275B6;
}
li.Fbtrick_Socail_Wrapper:hover .social_linkedin {
background: #02669E;
}
a.social_item.social_instagram {
background: #8E714D;
}
.fa-instagram.social_icon ~ .social_num {
background: #6F583C;
}
li.Fbtrick_Socail_Wrapper:hover .fa-instagram.social_icon ~ .social_num {
background: #8E714D;
}
li.Fbtrick_Socail_Wrapper:hover .social_instagram {
background: #6F583C;
}
a.social_item.social_pinterest {
background: #CA2027;
}
.fa-pinterest.social_icon ~ .social_num {
background: #AB1B21;
}
li.Fbtrick_Socail_Wrapper:hover .fa-pinterest.social_icon ~ .social_num {
background: #CA2027;
}
li.Fbtrick_Socail_Wrapper:hover .social_pinterest {
background: #AB1B21;
}
a.social_item.social_tumblr {
background: #3a5c7e;
}
.fa-tumblr.social_icon ~ .social_num {
background: #36465D;
}
li.Fbtrick_Socail_Wrapper:hover .fa-tumblr.social_icon ~ .social_num {
background: #3a5c7e;
}
li.Fbtrick_Socail_Wrapper:hover .social_tumblr {
background: #36465D;
}
</style>

<div class="Fbtrick_social_counter">
<ul class="social-counter">
<li class="Fbtrick_Socail_Wrapper">
<a class="social_item social_facebook" href="Facebook link">
<i class="fa fa-facebook social_icon"></i>
<br /><span class="social_num">2153</span></a></li>

<li class="Fbtrick_Socail_Wrapper">
<a class="social_item social_twitter" href="Twitter Link">
<i class="fa fa-twitter social_icon"></i>
<br /><span class="social_num">1151</span></a></li>

<li class="Fbtrick_Socail_Wrapper">
<a class="social_item social_youtube" href="Youtube Link">
<i class="fa fa-youtube social_icon"></i>
<br /><span class="social_num">2156</span></a></li>

<li class="Fbtrick_Socail_Wrapper">
<a class="social_item social_dribbble" href="Dribble Link"><i class="fa fa-dribbble social_icon"></i>
<br /><span class="social_num">1487</span></a></li>

<li class="Fbtrick_Socail_Wrapper">
<a class="social_item social_linkedin" href="Linkedin Link"><i class="fa fa-linkedin social_icon"></i>
<br /><span class="social_num">556</span></a></li>

<li class="Fbtrick_Socail_Wrapper">
<a class="social_item social_google-plus" href="Goole+ Link">
<i class="fa fa-google-plus social_icon"></i>
<br /><span class="social_num">2034</span></a></li>

<li class="Fbtrick_Socail_Wrapper"><a class="social_item social_instagram" href="Instagram Link"><i class="fa fa-instagram social_icon"></i>
<br /><span class="social_num">1525</span></a></li>

<li class="Fbtrick_Socail_Wrapper">
<a class="social_item social_rss" href="Rss feed Link">
<i class="fa fa-rss social_icon"></i>
<br /><span class="social_num">5124</span></a></li>
</ul>
</div>

Note :- Change the red color text with your Social Links and Blue Numbers with the followers you have on your Socail Sites


If you face any Problem In this Trick Must comment.
To get more cool trick of Candy Crush Saga Subscribe Us.


How to add HTML/JavaScript Widget in Blogger blog 2016

Today i am going to tell you How we use HTML/JavaScript widets In Blogger. Widgets are also known as Gadget so Don't be confused in Widgets and Gadgets.

Now a little Info about about the HTML/JavaScript widget. This Widget is used when we want to add some Html or Javascript Code in Blogger. Its Mainly used in Sidebars to add a widget like Subscription Form, Social Followers and Many more widgets. Means by using this widget you add many more widgets that blogger not provide to a Blog.


We create many Widgets if we have good knowledge of HTML and Javascript. Don't be sad if you don't know any of lanuages because there are many sites where you found many cool widgets. And to Add the widget in your blog you need to know How to add HTML/Javascript in Blogger.

So just follow the Steps and add HTML/Javascript widget in your blog.

1. Go to Blogger.com and Open your Blogger account.

2. Now click on Layout >> Add a Gadget. 


3. A popup window appear on screen. Click on HTML/JavaScript.


4. Now enter a Title and HTML or Javascript code in it and click on save.


And its Done you have added the HTML/JavaScript wiget in your blogger

Also Read :- Earn money with Amazon

If you face any Problem In this TUTORIAL Must comment.
Get more cool tips and tricks of blogger, facebook, android games and apps by Subscribe Us.

How to add custom robots.txt file in your bloggers blog

Today, i am here with a new Topic of blogger that is "How to add Custom Robots.txt in Your Blog". But first we will discuss a Little about it. I know you have a question in your Mind that is What is Custom Robots.txt and Why we use it.

What is Custom Robots.Txt And Why we use it?

Robots.txt is a text file which contains few lines of simple code. It is saved on the website or blog’s server which instruct the web crawlers to how to index and crawl your blog in the search results. That means you can restrict any web page on your blog from web crawlers so that it can’t get indexed in search engines like your blog labels page, your demo page or any other pages that are not as important to get indexed. Always remember that search crawlers scan the robots.txt file before crawling any web page.

Follow the steps and add Custom Robots.txt file in Your Blog

1. Login your blogger account.

2. Click on Settings >> Search Perferences >> Edit >> Select Yes.


3. Copy the below Code.

User-agent: Mediapartners-Google
Disallow:
User-agent: *
Disallow: /search
Allow: /
Sitemap: http://example.blogspot.com/feeds/posts/default?orderby=UPDATED


4. Paste the Code in Blank field. Now Change http://example.blogspot.com with your Blog URL and click on Save Changes.


You Are Done. Congratulations..

or 
Watch our video and see How to Add custom robots.txt file in your bloggers blog.

for any query or problem.. plz comment
Subscribe us to get more cool tricks and stuff.. :)
have a nice day friends. :)

How to Create first post on blogger and Publish it on Internet


Hey Friends!


In my Last post i mentioned about How to create a Blog On Blogspot

In this post i will tell you How to Create first post on blogger and Publish it on Internet.

There are two way to add a post on Blogger.

1. Simple Text
2. HTML Coding

By Simple texting you write a post Like you write it on Notepad. No designing, look simple.

And If you have basic knowledge of HTML then you create a stylish post, add tables and which you add your Text. And many more things you enter with HTML coding.

Now Follow The Steps And Create Your First Post On Blogger.

1. Go to blogger.com and Sign in. And click on New Post.


2. Write the title that best suits your post.


3. Click on Compose to Simple Text or Click on HTML to add Coding.


4. Now write what you want to write in your post. And Click on Preview to see a preview of your post.


5. Now click on Publish. And your first post is added in your blog. Visit your blog and see the first post of your Blog.

or 
Watch our video and see How to Create first post on blogger and Publish it on Internet


for any query or problem.. plz comment
Subscribe us to get more cool tricks and stuff.. :)
have a nice day friends. :)

How to Add custom domain to blogger buy from bigrock.in

Hey Friends! I m going to show you how to add bigrock custom Domain in your blog. First of we all need to know what is Custom Domain.

What is a Custom Domain?

A Custom Domain, also known as a vanity URL, is a way to create branded links to Spectate resources including Custom Links, Forms, Landing Pages, Callouts, and Files, using a domain name owned by your organization.

There are many sites from where you buy a Domain Name..

- GoDaddy
- BigRock
- 1 and 1
- EasyDNS
and many more

Now i am going to write the steps how you add a custom domain to your blog buy from BigRock.In

Just follow the steps and you add a bigrock domain with your blog.

Step 1:- Sign in your blogger account. Go to Settings >> Basic >> Publishing >> + Set up a third-party URL for your blog.


Step 2:- Now enter the Domain and click on "Save". It Shows an error. See the pic below. Don't Close the Blogger.


Step 3:- Now open a new Tab in browser and go to Bigrock.in click on Hello >> My account. you get login page. Now login with your bigrock User Name or Email Id and Password.

Step 4:- After Sign in Click on your Domain. My Domain is fbtrick.com.


Step 5:- Now click on DNS management >> Manage DNS.


Step 6:- Click on A Record >> Add A Record >> Copy the first proxy below and paste it in Destination IPv4 Address *:

216.239.32.21
216.239.34.21
216.239.36.21
216.239.38.21

Add 4 A record with each proxy...


Step 8:- Now click on CName Records >> Add CName Records. Now enter www in Host Name box and put Value ghs.google.com and TTL 28800 and save your cname record.


Step 9:- Now you have to create another CName record in Domain DNS to verify. See The pic below.


Step 10:- Now Click on Save. If you get save successfully means Domain successfully added in your blog.


or 
Watch our video and see How to Add custom domain to blogger buy from bigrock.in


for any query or problem.. plz comment
Subscribe us to get more cool tricks and stuff.. :)
have a nice day friends. :)

How to create First Blog On Blogspot

Hey Guys...

I am here to show you How you can create blog on BlogSpot. So you think why i create blog.

So friends just read these Lines and you get all your answers.

Create blog to Share your Thoughts, Skils, Talent, etc with world. A blog is a way by which you easily share anything you want with world. It works totally like a website. By blogging you earn money, share your thoughts, get fame and many more.

First of all we will Discuss a little about Blog.

What is a Blog?

A blog is a frequently updated online personal journal or diary. It is a place to express yourself to the world. A place to share your thoughts and your passions. Really, it’s anything you want it to be. For our purposes we’ll say that a blog is your own website that you are going to update on an ongoing basis. Blog is a short form for the word weblog and the two words are used interchangeably.

How it Works?

It totally works like a website. Anybody in the world can see your blog and read your content. There are many free Blogging Platforms that you can use to create a blog for yourself.  But if you are a Newbie and don't want to make an initial Investment then my suggestion is to start your blog with Blogspot. Because its Totally free, simple to use, and all the things that a new Blogger required is already in it. 

Why Blogspot?

If there is one platform that is easy for beginners to use, it is Blogspot. This is a free blogging platform that is simple to use for anyone just starting out with a blog. With this platform a user can just type their content, add photos and publish. 

Blogger also lets users edit HTML and add widgets to blog, which many blogging sites for beginners do not offer. Blogger is a Google service, so users will have to have a Google account and may find the Google-related add-ons redundant or useless for their blog. 

Some Points About Blopgspot

Blogspot is a blogging platform powered by Google gives you a great opportunity to start a Blog.
Once you have some blogging experience, go ahead for advance and become more professional with a self-hosted WordPress blog.

Now, I am going to show How you can create blog on BlogSpot and start a blog and share your blogging skills with the world . Blogging is a art and a way to spread your ideas to the world. It also provide opportunity to the blogger to earn from your blog.

Step to Step Guide to Create your first blog on Blogspot.

1. Open your favourite browser and Go to Gmail.com and Login your gmail Account

2. Now go to www.blogger.com. And u will see a page like below pic.


3. Now click on create a limited blogger Profile. And u will see a new page. Where enter your name and click Continue to Blogger.


4. Now click on New Blog.


5. Enter any Title I use "demo", enter any address or u can say link i use "demoxyz1234.blogspot.in", Choose template and click on Create Blog.

NOTE:- Don't use your name or any other thing that does not belongs to your Future Posts. Name your blog according to the posts that you will going to add in your blog. For Ex:- If you are going to write about Food then Name your Blog that is related to it.


6. See the pic below. You have created your first blog. Now open a new tab in your browser and enter the url link of your blog. Or Click on View Blog. And see your blog on Internet.


Or

Watch our video and see How to create blog on Blogspot Step by Step.


for any query or problem.. plz comment 
Subscribe ur to get more cool tricks and stuff.. :) 
have a nice day friends. :)